| HOW TO MEASURE YOUR ARTWORK
|
 |
|
Without picture framing experience, the task of ordering exactly the right size frame can be a bit daunting. Even once you have decided on the perfect frame that complements the color and style of your painting or print, there are other considerations to be made. Read on to learn more about selecting the correct picture frame size for your image.
|
| MEASURING ARTWORK - SUMMARY
|
|
When ordering your picture frame, there are a few measurements with which you must be familiar.
A Frame Without a Mat
- Determine exact horizontal (width) and vertical (height) artwork dimensions, accurate to 1/16".
- The framer adds 1/8" to both dimensions to allow for a 1/16" gap on all sides in case of miscalculation or contents' expansion over time. Do not factor this into your measurement.
- All frames have a lip that extends 1/4" into the artwork (to keep the art behind the frame). Do not subtract from your measurement to account for this overlap. You may want to ensure no significant part (ie: the artist's signature) is hidden.
A Frame With a Mat
- Measure your artwork as outlined above.
- Determine the width of mat you would like visible around the image. If you would like a 2" mat, this is the number you enter as the "mat width". Do not add this width to your artwork measurement.
- The total frame opening (including mat and image) will be calculated automatically once you have entered the measurements indicated above.
A Floater Frame for a Stretched Canvas
- The only measurement you must provide is the exact dimensions of your canvas.
- To determine canvas size, measure horizontally and vertically along the outer edge of the canvas. This is where the material is thickest (due to the corner folds). This will give you the most accurate measurement.
- Floater frames have a small gap (approximately 1/4") between the edge of the canvas and the frame. The framer will factor this into your custom order. Do not add this measurement to your canvas dimensions.
If you would like more information on measuring your artwork, please read the full article below.
|
MEASURING ARTWORK FOR A PICTURE FRAME
Even if the drawing or print you have purchased has the size noted directly on it, you still want to take some measurements to make sure. Sometimes the image doesn't come right to the edges of the paper, and you can't be certain whether the artist was measuring the size of the picture, or the size of the canvas.
If there is any white space around your artwork that you don't want showing in the final framed work, you may need to trim this section before measuring. If it is a very small amount (less than 1/4"), the lip of the picture frame may cover it, but you can't be certain of this until you have put the image into the frame.
The inner lip generally extends 1/4" into your image (see image 1), keeping the artwork from simply falling through the frame. If there was no extended lip, the edge of your artwork would be visible and not held behind the frame. It is important to remember this part of your image will be hidden from viewing, though it is such a small amount, it rarely affects the artwork.
When you are measuring, however, you don't need to take this inner lip into consideration. The framer will measure your frame from the back - inside the lip - not from the visible front edge.
Measure your artwork in a well-lit area, and use a measuring tape that has clearly marked gradations. Be sure to record the exact measurement, to a 16th of an inch - the framer can cut very precisely. The framer may also add 1/16" to the total frame size to accommodate any slight miscalculations, so if your measurements are any more than 1/16" off, your artwork may not fit correctly. It is also important to ensure your measuring tape stretches parallel across the artwork, ending at the same distance from the top as it started (see image 2).
Adding a Mat?
If you have decided on a matboard border between the artwork and the frame, you do not have to consider this extra width in your measurement. When you are ordering online with KeenART Media, we will ask you for the artwork size and mat size separately, and determine the frame's final dimension ourselves. (For instance: if your artwork is 8x10" and you would like a 2" mat surrounding it, the inside frame size will be 12x14".) Likewise, you do not have to be concerned with the outside dimensions of the picture frame (ie: whether the face of your chosen frame is 2" wide or 3" wide makes no difference for your measurements).
Remember the "mat offset". The mat will overlap the edges of your image approximately 1/8" on each side, so the artwork does not fall through the opening. The frame will then overlap the mat 1/4" on each side (so a 2" mat will have 1.75" showing on each side).
|
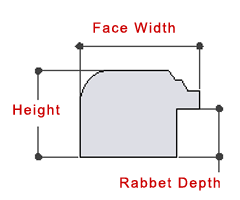
Important Moulding Measurements
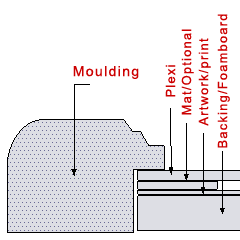
Moulding Layout

1. This 1/4" lip will cover some of your image.

2. Measure the artwork straight across.
|
MEASURING A FRAME FOR THE ARTWORK
If you are measuring an existing frame to determine what size artwork will fit, you follow much the same steps the framer would, as outlined above.
Flip the frame over so the face (the decorative part) is down. Measure width and height from the inside of the lip (against the upright inside edge, but including the lip), across to the inside of the other. This is the size of artwork your frame will hold (see images 3 and 4).
If you have a square frame, do not assume that the width will equal the height. Always measure both directions, just in case.
If you are confused about these instructions and the frame includes a glass or acrylic cover, take a look at where the glass lies. This is where your artwork will lie as well, and should give you an idea of what area you must measure. (Occasionally, in cheaper frames, the glass is just large enough not to fall through the front of the frame. In these cases, to be safe, measure the frame and not the pane of glass/acrylic.)
If you already have a frame and would like a mat, in this case you will have to take those measurements into consideration. Your artwork width will be the width of the frame opening minus double the width of the mat. The artwork height will be the height of the frame opening minus double the width of the mat.
- For example: If you have a frame with a 12x16" opening, and you want a 2" mat, the part of your artwork you want to show must be 8x12" (12 - 2*2=8; 16 - 2*2=12). Note: this does not account for the mat offset.
|
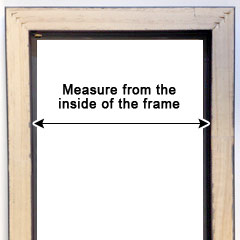
3. The right way to measure dimensions.

4. The wrong way to measure dimensions.
|
MEASURING A STRETCHED CANVAS
For a Picture Frame
A stretched Giclée canvas print looks great hung unframed on the wall, but it can also be mounted inside a wood picture frame. Due to the thickness of the folded corners, it is very important to correctly measure your canvas print, or it may not fit in the frame. For instance, even if you just ordered the print and you know you ordered a 24x15", you should still measure to make sure the final size was exactly that.
To ensure you order a large enough frame to fit your print, measure along the outside edges of the print, not across the center. This is where the canvas will be thicker, due to the folded layers in the corners (see image 5).
When purchasing a frame for a stretched canvas print, you must also consider the depth of the bars onto which it was stretched. If your canvas was mounted on 1.5" deep stretcher bars, and the chosen frame has a rabbet of only 1/2", your frame will protrude from the wall the additional 1".
For a Floater Frame
If your canvas was stretched on thick, 1.5" stretcher bars, you might consider a canvas floater frame. The canvas will sit inside this frame (instead of behind), creating a border around the outside that still showcases the curved edges of the wrapped canvas (see image 6).
Certain canvas floater frames are cut approximately 1/2" larger than the canvas, in order to create a "floating" effect of about 1/4" on each side of the canvas. When ordering your frame, do not account for this amount - the framer will factor it in automatically, and assume the given measurement is the exact size of the canvas.
For more information about floater frames, visit our useful canvas floater frame guide.
If your stretched canvas is skewed
If your canvas is old, it is possible the corners are no longer square (90°); this can cause problems with fitting. To check your canvas, measure it diagonally from the top left corner to the lower right, and the top right corner to the lower left (see image 7). If these two measurements are not equal, the edges are not square.
If the difference between the measurements is minimal (less than 1/4" for a large canvas, less than 1/8" for a small canvas), there shouldn't be a problem with fitting it into a frame. However, if there is considerable difference, you can try to either straighten out the edges by carefully and gradually pressing them inward (sometimes sandwiching the canvas between heavy objects will work), or opt for a frameless display.
|

5. Measure along the edge of the canvas.

6. The art "hovers" within the floater frame.
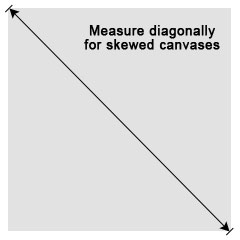
7. Skewed canvas? Measure diagonally.
|
SHIPPED THE WRONG-SIZED PICTURE FRAME? HOW TO SOLVE THE PROBLEM
If you ordered a picture frame from KeenART Media and received one that doesn't fit your image, don't panic! We are available to help remedy the situation.
First, take a look at your order confirmation (the email you were sent within 48 hours of placing your order). The measurement stated there should match the size of the frame if you measure as explained above. If it does, then there was probably a problem with the way you originally measured your artwork. Measure the artwork again, making sure you follow the instructions in the first part of this guide.
If you have correctly measured the picture frame and find it is a different size than what is stated on your order confirmation, then we may have made an error in the production. Measure your artwork again anyway, to make absolutely certain you ordered the right size frame.
Always contact us before sending your frame back. We will be happy to assist you in sorting out and correcting the issue.
We will have you email a photo, placing a measuring tape across the frame. In the case of a picture frame, you will place the tape across the back of the frame (see image 8). If you have purchased a floater frame, you will place the tape across the front of the frame (see image 9). Please make sure your photo is well-lit, taken either in natural light or in a room with good lighting.
|

8. Picture frame: Place the measuring tape across the back.
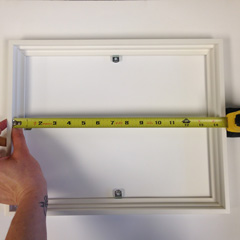
9. Floater frame: Place the measuring tape across the front.
|
|
All you need to make sure you get the perfect fit every time is a few minutes, a tape measure, and pen and paper. In no time flat, you'll have a beautiful, perfectly fitted photographic or painted display you'll cherish for generations.
At KeenART Media, we are always happy to help you troubleshoot your picture framing concerns. Give us a call or shoot us an email (see our contact us page) or if you live in the area, pop into the office.
|
|
© 2002-2026 - KeenART Media Ltd.
|
|
| |
|

